August 30, 2017
Hardware Sega Genesis Video Game Music Player 2.0
The next iteration of my video game music player featuring the real Sega Genesis sound chips. Now powered with a Teensy 3.5!


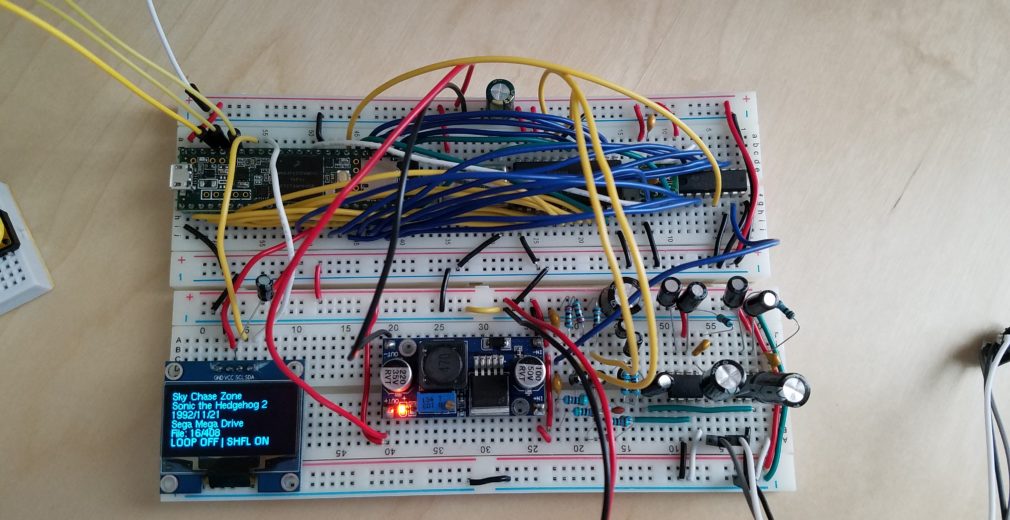

The next generation of my hardware video game music player is complete!
In the last version of my hardware Sega Genesis video game music player, I discussed my breakthroughs with getting the YM2612 and SN76489 to output real video game music from VGM files. In that project, I used the ESP8266 microcontroller, and while it seemed to work okay for the most part, it had several major drawbacks. First, the limited I/O was killing me. On the ESP8266, there was only 8 GPIO pins that I could use, so I had to incorporate the relatively slow 74HC595 serial shift registers in my design to expand my available I/O. Second, the ESP8266 has very limited flash storage. Onboard flash storage using the native file system (SPIFFS) only yielded about 2.3 MB of space for songs. That's enough space for maybe 10 songs if they're tiny. A couple of weeks ago when I was first working on new prototypes for this project, I decided to try out the successor to the ESP8266, the ESP32. At first, everything seemed great. The ESP32 was advertised with 34 GPIO - Awesome! Except that lots of the GPIO ports are input-only... or reserved for system use.. or can't be accessed because they control serial busses... That lead me back to using shift registers, which is what I wanted to avoid in the first place. Even then, it seems that the ESP32 did not want to play nicely! (noise warning on that video).
So my next challenge was to find a microcontroller that not only had oodles of available I/O pins, but the speed to process lots of data and the RAM to store it all. Enter the Teensy 3.5. Not only does it have 62(!) genuine GPIO, but it has 192 Kb of ram, is 5 volt tolerant, AND it even has a built-in high-speed micro SD card reader. It was the perfect chip, even if it was a little on the pricey side. I opted not to use the slightly faster Teensy 3.6 due to me being unsure of needing the 5 volt tolerance or not, but now, I can safely say that the Teensy 3.6 would be a perfectly compatible upgrade route should you ignore the PSG's ready signal like I do.
Challenges and Discoveries
Back when I was testing my failed ESP32 version of this project, I speculated that the reason for the intermittent and strange performance issues were due to the sound chips not playing nice with the 3.3 volt logic signals. Since these are older chips that run at five volts, that would make sense. However, I wasn't satisfied with speculation. I was going to see what the logical high level was for these chips for my self. How I did this was to hook up a potentiometer to +5v and ground, then connect the wiper terminal to my old ESP8266's YM2612 IC pin. Should this pin go low, it will reset the YM2612 and it will cease to make any noise. Slowly, I moved the wiper through its range, measuring the voltage with my mutimeter. After crossing the 1.5 volt threshold, the chip stopped outputting any noise. Bingo, the logical high level for the YM2612 is 1.5 volts. After a bit more testing with the same method, I found out that the logical high value of the SN76489 is also 1.5 volts. This means that each chip should have no problem with 3.3 volt signals.
Speaking of voltages, I also wanted to reduce the number of power inputs that I needed. The old ESP8266 version used three separate power supplies, 1 5v for powering the sound chips, another 5v from USB to power the hungry little ESP, and a 9v supply to power the amplifiers. On this version, I simply used a single 12 volt supply paired up with a cheap LM2596 buck converter module. The 12v line directly powers the two LM386 amplifiers and gets stepped down to 5v by the buck converter to feed all of the rest of the circuitry. It's important to note that the Teensy 3.5 is a 3.3 volt chip, but does include a small regulator on it's VIN pin that can handle up to 6 volts.
Next order of business was to test out a shiny new 7.78 MHz full-can crystal oscillator that I managed to find on eBay. These guys are pretty tough to come by, so I jumped on the opportunity to buy one. Sadly, since it's an older part, the data sheet has been lost (that seems to be a trend with the electronics that I'm interested in...). Thankfully, there's only 4 pins on this guy's package, so finding the pin-out via trial and error wasn't so bad.
For anybody wondering, the crystal brand is a SARONIX 30C167-05 at 7.68 MHz. Slightly faster than the YM2612's recommended speed of ~7.67 MHz, but honestly, I can't perceive any difference in the sound. The pinout for the Saronix crystal is:
VCC-------OUT
| |
NC-------GND
(Top-down view. Text on package should be right-side up and visible)
I still used the trusty LTC6903 programmable oscillator for the SN76489 though, since I couldn't find any full-can solutions for ~3.58 MHz.
The next challenge was to port-over the code from my last couple of VGM players so that it would run on my new Teensy microcontroller. This part wasn't actually too bad, but since I need to write data along a couple of parallel buses, I needed a way to either emulate the shift registers or the AVR PORTX feature. The Teensy series seems to have PORTX emulation built-in, but I couldn't find any good documentation on the subject, so I just took matters into my own hands. I'd first define a byte array of pin numbers that I wanted to use for my data bus, then, when ever I wanted to write something to that bus, I'd use a for loop to iterate through the bit positions and test for 1's and 0's. Depending on what each bit is set to determines the output state for the entire bus. Like so:
byte YM_DATA[8] = {0,1,2,3,4,5,6,7};
void SendYMByte(byte b)
{
    for(int i=0; i<8; i++)
    {
      digitalWrite(YM_DATA[i], ((b >> i)&1));
    }
}
Displaying Track Information on an OLED Display
I'd consider this to be the hardest part of the development cycle for this project. Driving the display itself really wasn't too bad. I simply used the U8G2 Library for that. The really tough part was parsing through the GD3 data within the VGM file. GD3 data is the meta data footer attached to the bottom of every VGM file. You can locate where the GD3 data begins by parsing out the GD3 offset starting at index 0x14 of the vgm file, then jumping down to that offset. Within the GD3 data, you'll find strings of oddly formatted 16-bit text delimited by sets of double 0's. Here you'll find lines such as the track title, which game the track is from, the console the game was on, composers, etc. The biggest challenge here was having to convert the 16-bit chars into 8-bit chars, since practically everything in my program and libraries rely solely on standard chars.
The way I did this was to first parse out the total size of the GD3 payload, create a temporary string to hold that data in, then use a for loop to iterate through that data. Within that for loop, I used two temporary chars to store the first half of the 16-bit char, and the second half. I'd only save the first half of data, unless both temporary characters happened to equal 0. Double 0's indicates a delimiter (end of a line of data), so I'd then insert the code for a new line within my temporary string.
  for(int i = 0; i<dataLength; i++)
  {
    char c1 = vgm.read();
    char c2 = vgm.read();
    if(c1 == 0 && c2 == 0)
      rawGD3String += '\n';
    else
      rawGD3String += char(c1);
  }
Now that I have my nicely formatted string of standard 8-bit chars with clearly defined delimiters, I can parse out all of the data that I want and can tell when there is a new line by just checking for "\n"
The reason behind the 16-bit chars was to store Japanese characters. Since my player only shows select English song data, I'd just skip over the Japanese sections.
Now, we're still not done yet. Now that we've obtained all of our song data safely stored away in string variables, we need to output them to the display. Sounds easy, right? Just call the graphics library function with your position data and string and that's it? NO! That's too easy! Of course you're not allowed to write arbitrary strings to the display!
You need to first convert your string into a character array, then call the library function with your new character array and position data, then you need to send the pixel buffer over to the display. Duh!
I've actually found a pretty short an elegant solution to that whole string->c string problem though:
String trackTitle = "My Song Name";
u8g2.clearDisplay();
char *cstr = &trackTitle[0u];
u8g2.drawStr(0,10, cstr);
u8g2.sendBuffer();
This method actually seems to work very well and allows you to insert strings of arbitrary length. It's a little bulky, but hey, it works!
SD Card Support
SD card support was another big feature that I desperately desired on my player. Having SD support basically means that I can store a virtually unlimited amount of songs on my player, which is totally awesome. I was originally going to use the standard "SD" library, but I found its features too limiting. Instead, I've opted to use the much more powerful SdFat library. Now with added power, comes added complexity. I managed to get simple file-reading done in no time, but something was wrong. SdFat refused to read my lone VGM file, regardless of what I tried. Why? Well, it turns out that Windows likes to plop a hidden folder named "System Volume Information" onto any drive it can get its hands on. This is mostly for recycle bin support, but never the less, it was annoying as hell because I wasn't able to detect or remove it from my desktop computer. After a quick boot into a Linux environment and mounting the offending SD card, the magic mystery "System Volume Information" folder was there clear as day. Instead of having to remove that folder manually every time I re-wrote to the SD card on Windows, I decided to have my project terminate it automatically with extreme prejudice.
void RemoveSVI() //GTFO WINDOWS
{
  File nextFile;
  nextFile.openNext(SD.vwd(), O_READ);
  char name[MAX_FILE_NAME_SIZE];
  nextFile.getName(name, MAX_FILE_NAME_SIZE);
  String n = String(name);
  if(n == "System Volume Information")
  {
      if(!nextFile.rmRfStar())
        Serial.println("Failed to remove SVI file");
  }
  SD.vwd()->rewind();
  nextFile.close();
}
Now navigating through the file system was a whole other challenge. With SdFat, you can only iterate forwards to the next file. Never backwards, never randomly. In that case, I had to get creative. I would store the current file index as an integer, then, should I need to change the song in any direction or even pick a random song, I would just start from the very beginning of that list and iterate through every file until my index matched where it was supposed to be. Slow and a little clunky? Actually, not really. Even with hundreds of files, the correct track is resolved in under a second.
Here's an example of how I picked a random file from the SD card:
  randomSeed(micros());
  uint16_t randomFile = currentFileNumber;
  while(randomFile == currentFileNumber)
    randomFile = random(numberOfFiles-1);
  currentFileNumber = randomFile;
  SD.vwd()->rewind();
  nextFile.openNext(SD.vwd(), O_READ);
  {
    for(int i = 0; i<randomFile; i++)
    {
      nextFile.close();
      nextFile.openNext(SD.vwd(), O_READ);
    }
  }
  nextFile.getName(fileName, MAX_FILE_NAME_SIZE);
  nextFile.close();
As of writing this, my project supports moving forwards, backwards, picking a random song, "shuffle" mode, looping mode, and standard "album" mode where songs are played in order. You can also request songs via the serial console by their file names by using the r: command. For example, r:mySongFileName.vgm . Once this command is sent, the program will search the SD card for files matching "mySongFileName.vgm." Should it find the target file, the new file will be opened. Otherwise, the program will continue with the current song. Keep in mind that your spelling and capitalization must be perfect! Spaces in file names are also allowed, too. Just remember to use uncompressed .vgm files, not compressed .vgz files. You can uncompress a vgz file using a tool like 7zip and dragging out the internal file.
Final Thoughts & What's Next
This version of the project was really fun. While there were quite a few new challenges to deal with, working with the Teensy line of boards has been a dream. It helps that the Teensy boards program near instantly - 2 seconds compared to the ESP's mind-melting ~30 seconds. This sped up prototyping significantly. Not only that, but I've decided to give the Atom text editor from Github a go and paired it with PlatformIO. Atom is... eh... I don't know. Meh to be honest. Pretty slow, clunky, and not very well designed. PlatformIO though is amazing. Everything under one roof and ready to go instantly. Love it.
I think the next step for this project will involve soldering it together since I'm more than happy with the results so far. I think it has been refined down to a point where the bugs and hardware problems are minimal and the performance is near optimal. With a bit more research, I could probably make my program much more efficient, but at this point, it runs every song I throw at it at full speed. It's so cool to have this little player jamming out hundreds of genuine Genesis tunes all day long automatically. It even serves as a platform to hear what unreleased game and homebrew soundtracks would sound like on genuine hardware. It's super cool, sounds great, and I'm very proud of it! :)
...And finally, the schematic, so you can build your own too!

Hello Aidan,
Very very ,neat project!
I just got my head around trying to build something similar, but my aim would be to use the YM2612 and other chips as a modifiable synth, without the playback of specific songs/sounds.
I was thinking having a bunch of knobs and sliders to control the sound/channel parameters via midi on the teensy.
Have you tried something similar by any chance, or have some advice on how to implement that using your project as a base?
Thank you in advance and create work!
Victor
Hello Victor,
I actually did just that! You can read all about my MegaDrive synthesizer project here:
https://www.aidanlawrence.com/mega-midi-a-playable-version-of-my-hardware-sega-genesis-synth/